1. Digital
Feel free to use your laptop
You are strongly encourage to work with others
When you get stuck, ask those sitting around you for help
Get used to working together in the labs
Peer teaching and peer learning has been empirically shown to be very effective
1.1. Starting with Digital
Download and uncompress Digital, the simulation software used in this course
Digital can be downloaded from here
Be sure to save it somewhere useful
Don’t forget to uncompress the file
Run Digital
Open the uncompressed folder and run it
On Windows, run the executable (exe) file
On Mac or Linux, run the bash (sh) or java archive (jar) file from a terminal opened to the proper directory
./Digital.shjava -jar Digital.jar
A java runtime environment is required to run the software
Digital should prompt for a download if necessary
Skip the tutorial for now
The tutorial will be done shortly
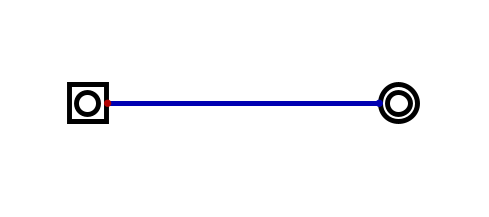
Place an input and output on the workspace and connect them with a wire
Input components can be found through the top menu Components -> IO -> Input
Output components can be found in the same menu
Wires are added by clicking and then moving the mouse around the workspace
Have the input and output components such that a single, straight horizontal wire connects them
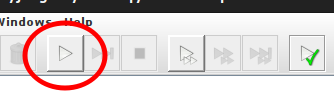
Run the circuit and interact with the input button
Select the play button to run the circuit
1.2. Interacting with the Workspace
Make a copy of the circuit
This can achieved by selecting the whole circuit with a click and drag, copy, and paste
Once selected, copy with the hotkey ctrl + c
Paste with ctrl + p
Remove the copy by performing undo commands
Undo can be done with the hotkey ctrl + z
Redo can be done with ctrl + y
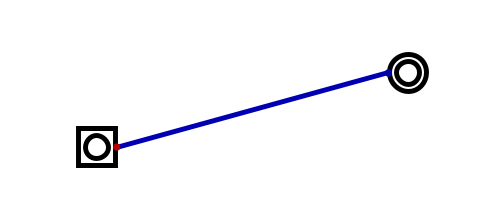
Move the output higher or lower vertically such that the input and output are not on the same line
This can be done by selecting a portion of the circuit to move with a click and drag
Then, click and drag the selected portion of the circuit up or down
Be mindful to have the output component and the wire selected before moving it
Otherwise the output will disconnect from the circuit
After doing this, the wire is likely diagonal; however, ideally the wires are kept horizontal and vertical only
Delete the wire and add a new wire that is made up of only vertical and horizontal segments
Now try to move the output component around, while staying connected to the circuit, without adding diagonal segments
Be mindful of what segments of the wire are selected before dragging them around the workspace
This takes some getting used to
If diagonals are created, undo and try re-selecting different segments of the wire before dragging components

Excluding the “Components” menu, explore the different top menus and options within them,
Play around with the options and settings to see what they do
1.3. Tutorial
Delete everything or create a new file
Run the tutorial
The tutorial can be started by selecting View -> Start Tutorial
As the tutorial instructed, run the circuit and interact with it in real time
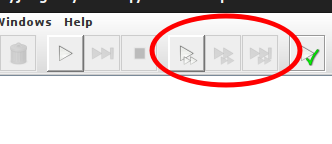
Re-run the circuit in “Single Gate Stepping” mode and see how this differs from running the circuit regularly
Make use of the “Gate Step” button
Stop the circuit open the analyze window and make sense of what it shows
Found in Analysis -> Analysis
Add a Data Graph component to the workspace, re-run the circuit, and interact with the inputs
The Data Graph component is found under Component -> IO -> Data Graph
The Data Graph component does not need to be connected to anything
1.4. Explore Components
Much of the components that Digital provides are complex, and several will be discussed and worked towards in this course. At this stage, there is no expectation that any of these components are understood by the students.
Start adding different components to the workspace and try to interact with them
Some of these will be easier to understand than others
Some components have special settings that can be altered by right clicking on the component
If a component does not make sense, right click on the component and select “Help”
1.5. Digital’s Example Files
Digital provides many example circuits that are included with the software.
Explore provided files by loading them, running them, and interacting with them
Open these files through the File -> Open menu
These provided circuits can be found within the “examples” folder within the “Digital” folder
There are many, so do not expect to open every one
Take the time to explore those that seem interesting
Some are quite fun
Share interesting ones with those around you
1.6. Playing
Play around within Digital and the various components to try and build something interesting
Work together and share ideas with one another
Ask questions if stuck
Have fun